

Connecting Claude to Your Knowledge Base
A Complete Beginner's Guide


Last week, I spent an hour setting up something that is changing how I work with structured content. I connected Claude (the AI assistant) directly to my Anytype knowledge base, and now I can manage my content through simple conversation instead of clicking through menus.
Instead of switching between Claude and my content management system, I can now say things like "Create a new project space for newsletter planning" or "Show me all my concept notes from last month" and watch Claude actually do these tasks in my knowledge base.
For content professionals and educators juggling multiple information systems, this represents a meaningful shift toward truly integrated AI workflows. Here's how you can set it up—explained step-by-step for complete beginners.
This looks intimidating, but it is actually quite easy. And if you don’t know a lot of this tech stuff, it is a great way to learn it.
As I’ve said for a while now, every writer should know a little code … Or at least how it works.
What We're Actually Building
Imagine having a conversation with Claude where you say "Create a new folder for my upcoming course materials" and Claude actually creates that folder in your knowledge management app, organizes it properly, and confirms it's done. That's what we're building.
The technical name for this is "Model Context Protocol" (MCP), but think of it as a bridge that lets Claude directly work with your other apps instead of just talking about them.
Why I'm Using Anytype for This Tutorial
I chose Anytype for this demonstration for several strategic reasons that align with where I think AI integration is heading:
It's Free and Privacy-Focused. Anytype offers a generous free plan with unlimited objects, offline access, and end-to-end encryption. Your data is stored locally on your device with decentralized storage for enhanced privacy and data security, which means you maintain complete control over your information.
Object-Based Architecture. Unlike traditional note-taking apps that treat everything as linear documents, Anytype uses an object-based approach where every piece of information—a meeting, person, project, or concept—becomes a structured object. These objects combine to form a unique knowledge graph that serves as a universal data structure designed for automation and machine learning.
Built for AI Integration. Anytype's objects are specifically designed for automation, machine learning, and personal assistants. The structured, relationship-rich format makes it ideal for AI systems to understand and manipulate content intelligently. Instead of AI trying to parse unstructured text, it works with clearly defined objects and their relationships.
Future-Proof Knowledge Management. The object-based approach allows you to see connections between different concepts, identify patterns, and discover insights that may have otherwise gone unnoticed. This kind of structured thinking aligns perfectly with how AI systems process and understand information.
While you could follow similar steps to connect Claude to other knowledge management tools like Notion, Obsidian, or Logseq, Anytype's combination of privacy, structure, and AI-readiness makes it an excellent choice for experimenting with AI-integrated workflows.
The principles we'll explore—connecting AI to structured content systems—apply broadly, but Anytype's architecture gives us a particularly good foundation for seeing what's possible when AI can work directly with well-organized knowledge.
Important: What You Need to Know First
This Only Works on Desktop: Right now, this setup only works with the Claude Desktop app on your computer, not the Claude website. You'll need to download and use Claude Desktop.
You'll Use Your Computer's "Command Line": This setup requires using something called Terminal (on Mac) or Command Prompt (on Windows). Don't worry—I'll explain exactly what this is and what to type.
It Can Be Finicky: Sometimes the connection breaks and you need to restart things. This is normal and usually easy to fix.
Mac Instructions: These steps are written for Mac computers. The process is similar on Windows but with different commands.
Essential Terms Explained
Before we start, let's define the technical terms you'll encounter:
Terminal: A text-based way to give commands to your computer. Instead of clicking buttons, you type instructions. On Mac, it looks like a black window with white text.
Command Line: Another name for working in Terminal. When we say "type this in the command line," we mean type it in Terminal.
API Key: A special password that lets one app (Claude) access another app (Anytype). Think of it like giving Claude a key to your Anytype account.
Node.js: A behind-the-scenes program that helps other programs run. Claude Code needs this to work properly.
Claude Code: Anthropic's command-line tool that acts as the bridge between Claude and other apps.
JSON File: A type of text file that stores settings and configuration information in a specific format.
What You Need Before Starting
Important: This requires a paid Claude subscription
A Mac computer running macOS 10.15 or newer
An Anytype account with your content in it (free knowledge management tool with end-to-end encryption)
A paid Claude subscription: Either Claude Pro ($20/month) or Claude Max ($100-200/month) or billed API (per token)
About 60 minutes and patience for troubleshooting
Two Ways to Pay for Claude Code Access
Claude Code requires payment, but you have two options depending on your needs:
Option 1: Claude Subscription (Easiest for Most People)
Claude Pro: $20/month
Claude Max: $100-200/month
Includes unlimited Claude Desktop access plus web interface
Best for: Regular Claude users who want both chat and MCP features
Setup: Simple one-click authentication
Option 2: Anthropic API Access (Pay-as-You-Go)
No monthly subscription fee
Pay only for what you use (typically $0.003-0.015 per 1,000 tokens)
Requires setting up billing in Anthropic Console
Best for: Light usage, developers, or people who only want MCP features
Setup: Requires API key configuration
If you currently have a free Claude.ai account, you can either upgrade to a paid subscription OR set up API billing. Both work with Claude Code, but the subscription is usually simpler to set up and manage.
⭐ The free Claude.ai web interface does NOT support MCP connections - you need one of the paid options above.
Step 1: Open Terminal (Your Computer's Command Line)
What is Terminal? Terminal is a way to give your computer text-based commands instead of clicking buttons. It looks intimidating but we'll only use simple commands.
How to open Terminal:
Press
Cmd + Space(this opens Spotlight search)Type "Terminal"
Press Enter
A black window with white text will open—this is Terminal
You’ll see something like this:
YourName@YourComputer ~ %
This means Terminal is ready for your commands.
Step 2: Check if Node.js is Already Installed
What is Node.js? It's a program that helps other programs run. Claude Code needs it to work.
In Terminal, type this exactly and press Enter:
node --version
What happens next:
If you see something like "v18.20.0" or "v20.11.0": Great! Node.js is installed. Skip to Step 4.
If you see "command not found": You need to install Node.js. Continue to Step 3.
Step 3: Install Node.js (If Needed)
If Node.js isn't installed:
Go to nodejs.org in your web browser
Click the big green button that says "LTS" (Long Term Support)
This downloads a file to your Downloads folder
Find the downloaded file (it ends in .pkg) and double-click it
Follow the installation steps (just keep clicking "Continue" and "Install")
Enter your Mac password when asked
Important: Close Terminal completely and open it again
Test again by typing
node --versionin Terminal
Success looks like: "v20.11.0"
Step 4: Install Claude Code
What is Claude Code? It's the program that lets Claude connect to other apps.
In Terminal, type this command and press Enter:
npm install -g @anthropic-ai/claude-code
What happens: You'll see text scrolling by as your computer downloads and installs Claude Code. This might take 1-2 minutes.
If you get a "permission denied" error: Try this instead:
sudo npm install -g @anthropic-ai/claude-code
Then enter your Mac password when prompted.
Test it worked by typing:
claude --version
Success looks like: You see a version number for Claude Code.
Step 5: Set Up Claude Code Authentication
In Terminal, type:
claude
What happens:
Your web browser will automatically open
You'll see a page asking you to connect your Claude account
If you have a Claude Pro/Max subscription: Choose "Claude App"
If you have API access: Choose "Anthropic Console" and you'll need your API key
Log in with your credentials
Approve the connection
Return to Terminal—you should see that Claude Code is ready
Don't have either yet?
For Claude subscription: Go to claude.ai and upgrade your account
For API access: Go to console.anthropic.com, create an account, and set up billing
Step 6: Get Your Anytype API Key
What is an API key? It's like a special password that lets Claude access your Anytype account.
How to get it:
Open Anytype on your computer
Look for "Settings" (usually a gear icon)
Find a section called "Account," "API," or "Developer"
Look for "Generate API Key" or "Create API Key"
Copy this key—it will look like a long string of letters and numbers
Keep this safe—you'll need it in the next step
Note: If you can't find API settings, check Anytype's help documentation or contact their support.
Step 7: Create the Connection Configuration
What we're doing: Creating a settings file that tells Claude how to connect to Anytype.
In Terminal, type this command:
open ~/.config/claude-desktop/
What happens: A Finder window opens showing a folder. If you see an error about the folder not existing, don't worry—we'll create it.
If the folder doesn't exist, create it:
In Terminal, type:
mkdir -p ~/.config/claude-desktop/Then try opening it again:
open ~/.config/claude-desktop/
In that folder, create a new file:
Right-click in the empty space
Choose "New Document" or open TextEdit
Create a new plain text document
Save it as exactly:
config.json
In that config.json file, paste this text (replace YOUR_API_KEY with your actual Anytype API key):
{
  "mcpServers": {
    "anytype": {
      "command": "npx",
      "args": ["-y", "@anyproto/anytype-mcp"],
      "env": {
        "OPENAPI_MCP_HEADERS": "{\"Authorization\":\"Bearer YOUR_API_KEY\", \"Anytype-Version\":\"2025-05-20\"}"
      }
    }
  }
}
For example, if your API key is "abc123xyz789", it would look like:
{
  "mcpServers": {
    "anytype": {
      "command": "npx",
      "args": ["-y", "@anyproto/anytype-mcp"],
      "env": {
        "OPENAPI_MCP_HEADERS": "{\"Authorization\":\"Bearer abc123xyz789\", \"Anytype-Version\":\"2025-05-20\"}"
      }
    }
  }
}
Save this file.
Step 8: Download and Open Claude Desktop
If you don't have Claude Desktop yet:
Go to claude.ai
Look for "Download" or "Desktop App"
Download and install Claude Desktop
Log in with your Claude account
If you already have Claude Desktop:
Make sure it's completely closed (right-click the icon in your dock and choose "Quit")
Wait 10 seconds
Open Claude Desktop again
Step 9: Test the Connection
Look for the connection indicator: In Claude Desktop, look for a settings tab or menu area just below the chat input box. You should see MCP server options or tool configurations listed there.
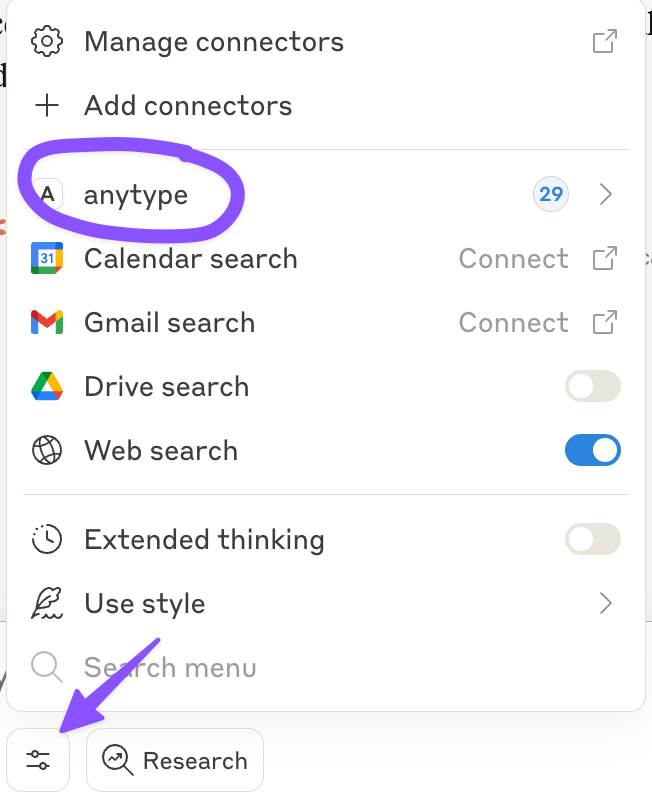
If you see the Anytype connection:
Look in the settings area below the chat input
You should see "anytype" listed as an available tool or server
Success! The connection is working.
Test it by typing this message to Claude: "Can you show me what spaces I have in Anytype?"
What should happen: Claude will ask for permission to access Anytype, then show you information from your Anytype account.
What You Can Do Now
Once connected, you can manage your knowledge base through conversation:
"Create a new space called 'Course Planning' in Anytype"
"Add a new task about reviewing student submissions"
"Show me all my notes tagged as 'curriculum development'"
Claude handles all the clicking and organizing while you focus on your content and teaching.
When Things Go Wrong (Troubleshooting)
I don't see the MCP icon in Claude Desktop:
Make sure you completely quit and restarted Claude Desktop
Check that your config.json file is saved in the right location
Verify your API key is correct in the config file
Claude says it can't connect to Anytype:
Go back to Anytype and generate a new API key
Update your config.json file with the new key
Restart Claude Desktop
I get "command not found" errors in Terminal:
Make sure you're typing commands exactly as shown
Restart Terminal after installing Node.js
Check that Node.js installed correctly by typing
node --version
The connection works sometimes but not others:
This is normal—MCP connections can be temperamental
Make sure Anytype is open when looking for connection
Usually fixed by restarting Claude Desktop
Sometimes you need to regenerate your API key
Why This Matters for Content Professionals
This setup demonstrates something significant about the future of knowledge work. Instead of AI being just a conversation partner, it becomes an active participant in your content workflow.
You can now think out loud with Claude about your content strategy and have it immediately implement organizational changes in your knowledge management system. This reduces the cognitive overhead of managing multiple tools and lets you focus on higher-level thinking.
Questions for you
What tools would you most want Claude to connect to? What would change about your workflow if AI could directly manage your content operations? Have you tried connecting AI to other systems?
I'm particularly interested in hearing about:
Alternative approaches you've discovered
Tools you think would benefit from AI integration
Obstacles you've encountered with AI workflow integration
What systems are missing from your integrated workflow? What would an AI assistant need to access to truly transform how you work with content?
This is just what I have been looking for (I hope).
I’ve been prodding at the learning curves for RAG and small-scale ontology development. This might be much better for my use case
Have you tried any connections between this and Zotero, by any chance?