


To migrate a custom GPT to a plugin, open My GPTs in ChatGPT and choose “Migrate to plugin.” Your instructions become a skill, and your knowledge files become reference files. Custom actions, your model choice, and unpublished drafts don’t carry over. Save your own copy first, because the original becomes read-only after migration and disappears on December 11.
OpenAI says you can migrate your custom GPTs with the click of a button.
You might want to hold off on that.
The button moves your files, but it doesn’t check whether they’re any good. It doesn’t tell you what the GPT builder wrote on your behalf, and it doesn’t keep a copy you control.
In my last post, I argued that what matters in a custom GPT is the instructions and knowledge inside it, not the chatbot. This post shows you how to save that knowledge and move it.
By the end, you’ll have:
a saved copy of everything your GPT holds,
a portable markdown bundle built from it,
a simple test that shows whether the new version works as well as the old one, and
a migrated plugin, if you still want one.
My principle has always been ... control your knowledge. Don’t give it away to AI just to save some time.
Step 1: Save your own copy first
Do this before you click anything.
Once you migrate, the original GPT becomes read-only, and after December 11 you won’t be able to reach it at all.
My principle has always been ... control your knowledge. Don’t give it away to AI just to save some time.
Open ChatGPT, go to My GPTs, and find your GPT under Created by me. Click to edit it, then switch to the Configure tab. Everything lives there, even if you built the GPT by chatting with the builder.
Copy these into a plain text or markdown file:
Name and description. You’ll reuse them later.
Instructions. Copy the whole block. If the GPT builder wrote them for you, this may be the first time you’ve read them start to finish. Read them now.
Conversation starters. They don’t transfer one-to-one, and they show what you expected people to ask, which helps with testing.
Knowledge files. ChatGPT doesn’t give you an easy way to download them, so list every file and find your original copies. If one is missing, note it so you can rebuild it.
Capabilities. Note whether web search, image generation, or data analysis was turned on. The plugin may not set these up the same way.
Actions. Some GPTs connect to outside services through custom actions, like looking up an order or creating a help-desk ticket. If yours has any, copy the schema and note what each one does. Actions don’t carry over and have to be rebuilt as a connected app or an MCP server.
While you’re in there, save a few prompts that worked well, including one tricky one. Previous chats may not copy over, and you’ll want them for testing.
A student who has only used my chatbot loses it on December 11. A student who has built one can rebuild it in whatever tool comes next.
Also note that only a published GPT can be migrated, and your model choice and sharing settings don’t come along.
Put all of this in one folder. That folder is the start of your bundle.
Step 2: Restructure it as a markdown bundle
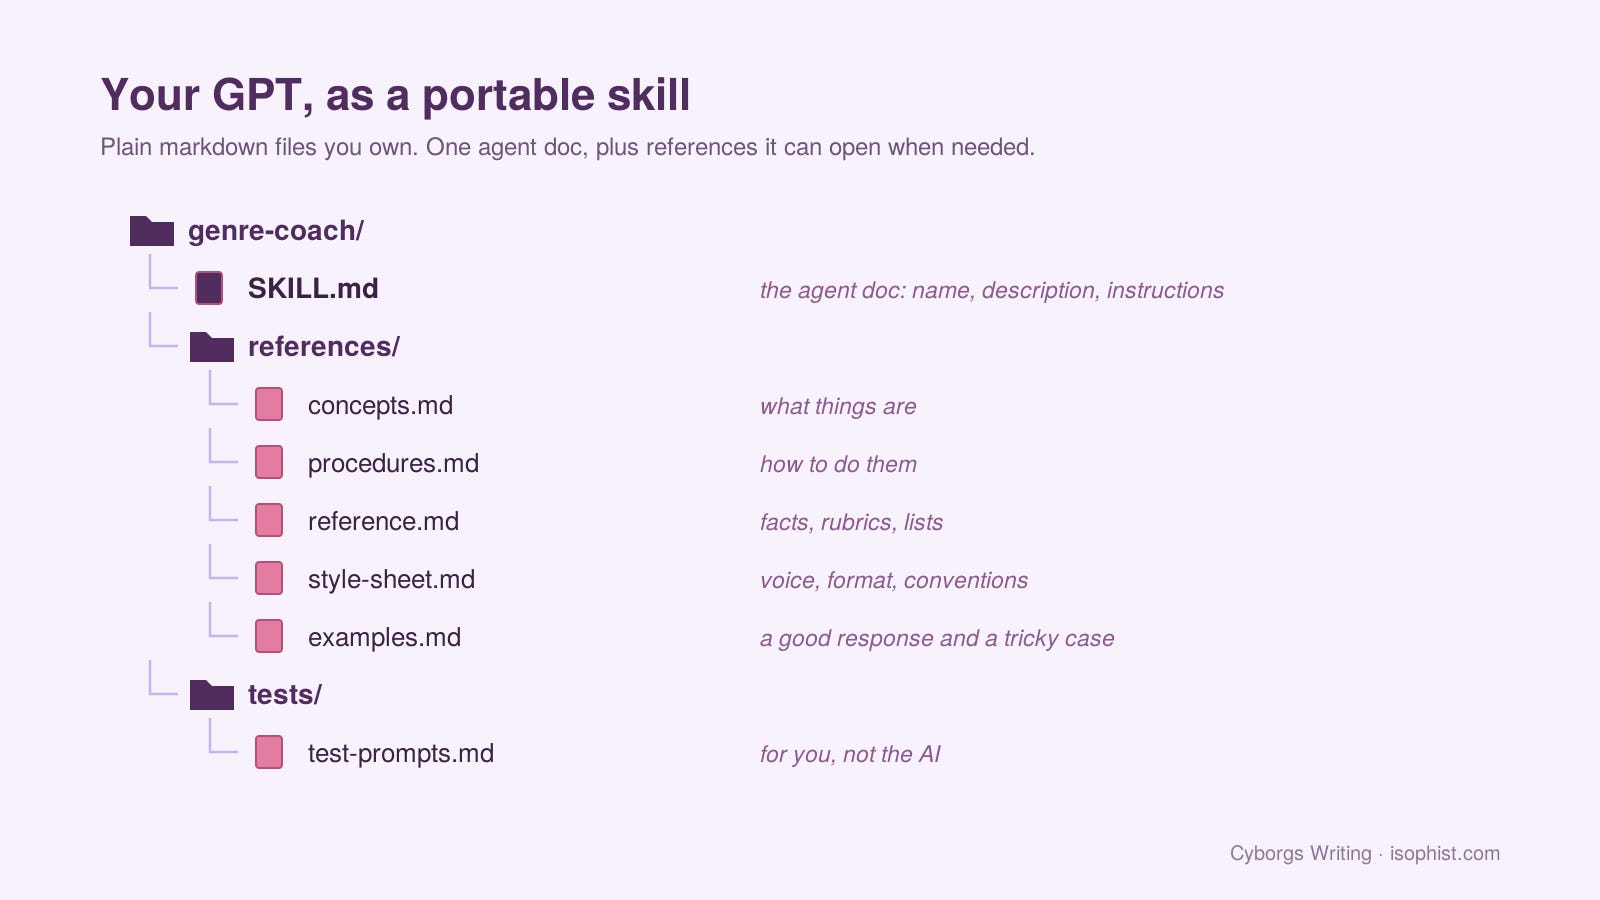
Your GPT probably holds everything in one long instructions box and a handful of uploaded files. A bundle splits that into plain files, each with one job. ChatGPT and Claude both use the same skill format, so this one folder works in either.
New to markdown? Markdown is plain text with a few symbols for formatting, like # for a heading, * for a bullet, and ** for bold. It opens in any text editor, and every AI tool reads it well. The Markdown Guide covers the basics in five minutes.
You don’t have to write it by hand, though. Draft each file however you like, then paste it into any AI tool with this prompt:
Convert this into a clean markdown file. Use # headings for each section, bullets for lists, and tables for anything that compares items. Don’t add, cut, or reword any content. Only change the formatting.
If this is my SKILL.md, also add a frontmatter header at the top with a name (lowercase, hyphens only) and a description of one or two sentences that says what the skill does, when to use it, and what it shouldn’t handle. Show me the description separately so I can check it.
Check the description it writes. It’s the one part the AI creates rather than reformats.
SKILL.md.
This is the agent doc, the file the AI reads first. It starts with a short header holding a name and a one- or two-sentence description of what the skill does and when to use it.
The description matters more than it used to. A GPT applied its instructions to every message. A skill runs only when the AI decides it fits, and the description is what it uses to decide.
Below the header go the instructions ... who the AI is helping, what it should do, and when to open each reference file.
Don’t forget that last part ... its often called a trigger. Without a line like “use concepts.md when the student confuses description with analysis,” the AI may never open the file. You can see real examples in my public skills library.
References.
Don’t just copy your uploaded files into this folder. Break them into smaller files, each covering one kind of information. An AI retrieves a clean chunk more reliably than a 40-page PDF.
How you split them depends on the kind of knowledge and tasks you’re dealing with. I’ve been experimenting with information types, so explanations of what something is go in one file, step-by-step procedures in another, and facts you look up, like rubrics and deadlines, in a third. A course GPT might need a different split than a brand-voice GPT.
If you want to go deeper, start with What Information Actually Is and Using Information Types to Build.
Your style sheet goes here too, with tone, length, citation style, and words to avoid. So does a short examples file with one response you liked and one tricky case with the answer you wanted. Examples often teach the AI more than another paragraph of instructions.
Tests.
Paste in the prompts you saved in Step 1. The AI never reads this folder. You’ll use it in the next step.
Here’s how my own Writing Genre Coach splits up.
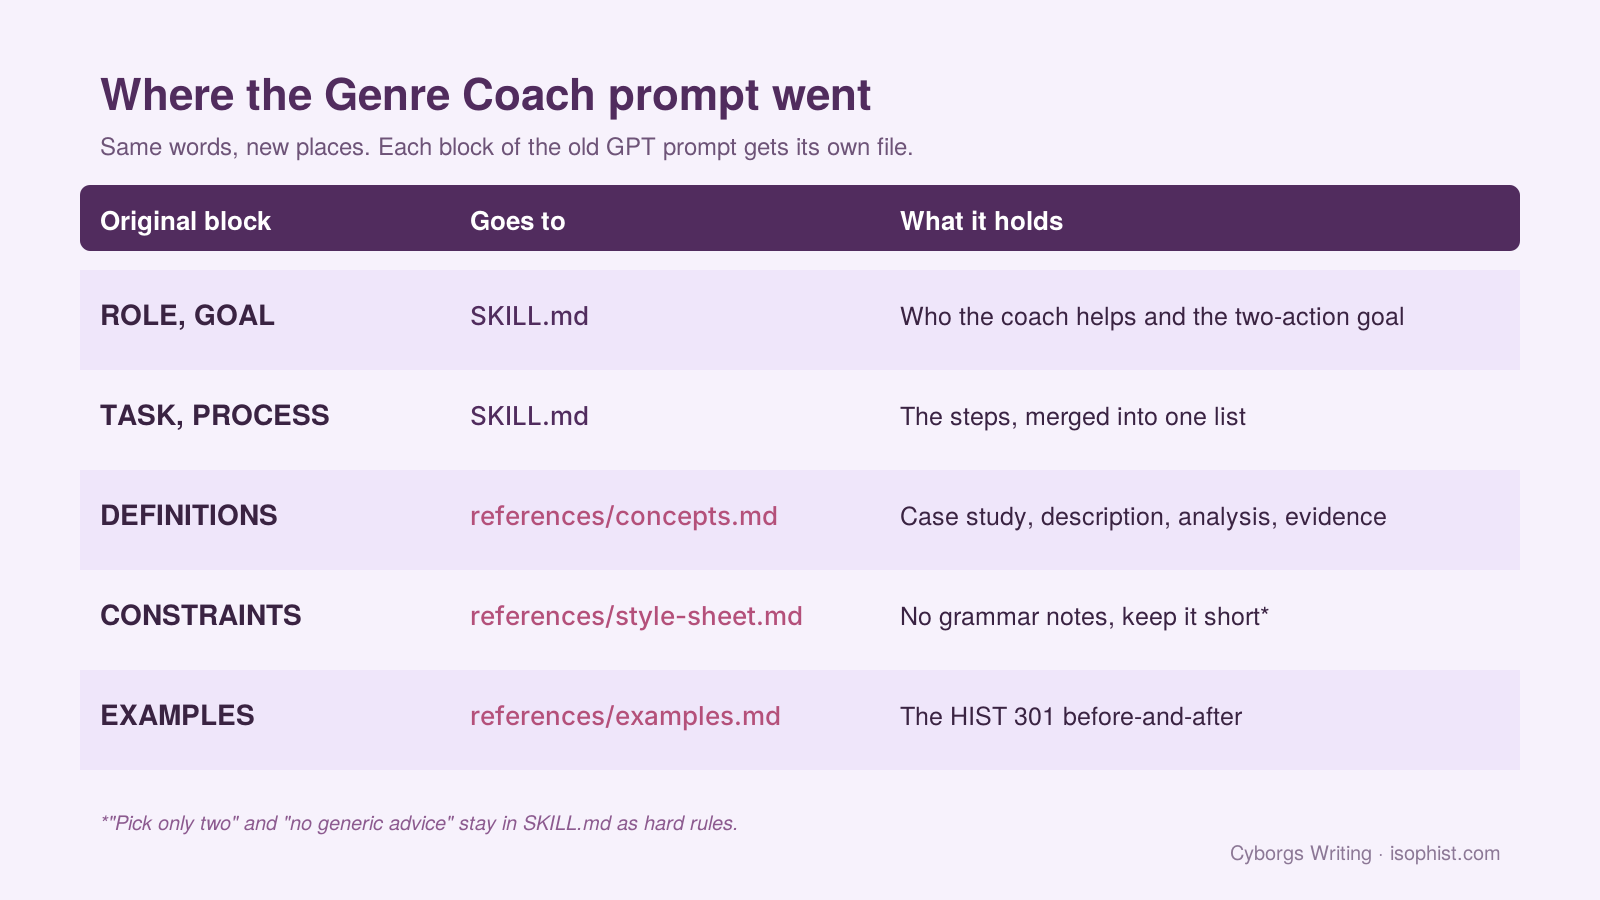
Its DEFINITIONS block, which covers what counts as a case study, description, analysis, and evidence, moves to concepts.md.
CONSTRAINTS like “no grammar notes” and “keep it short” go in the style sheet.
ROLE, GOAL, TASK, and PROCESS stay in SKILL.md. The prompt didn’t get any shorter, but each piece now has its own place.
What about AGENTS.md?
You may have seen another agent doc called AGENTS.md. It does a different job. SKILL.md loads only when the task calls for it. AGENTS.md loads every time and describes a whole workspace, including what’s in it, how it’s organized, and the rules that always apply.
A single skill doesn’t need one. But if you keep several bundles in one knowledge base, as I do, an AGENTS.md at the top tells the AI how the whole thing fits together.
That’s the subject of my knowledge base series.
You also don’t need to write a plugin manifest by hand. ChatGPT’s migration tool creates one for you.
Step 3: Test before and after
In my last post, I argued that agent documentation needs testing like any other documentation. This step is how you do that.
Open tests/test-prompts.md and make sure it has five to ten prompts. Include the ones you saved in Step 1, at least one tricky case, and one prompt that shouldn’t use the skill at all.
For my Genre Coach, that might look like:
a student draft that’s all description and no analysis,
a strong draft that needs only small fixes,
a draft with no evidence at all (the tricky case), and
a student asking how to cite a source, which isn’t a genre question, so the skill should stay quiet.
Then run every prompt in three places:
Your original GPT, while it still works. This is your baseline.
The migrated plugin, if you plan to use ChatGPT.
Your bundle in whatever tool you’ll actually use.
Save each answer next to its prompt. A simple table is enough, with one row per prompt and one column per version.
Then read the answers side by side and ask four questions:
Did it use the right knowledge?
Did it follow the style sheet?
Did it handle the tricky case?
Did the skill turn on when it should, and stay off when it shouldn’t?
The last question is new. A GPT ran whenever someone opened it. A skill has to be picked, so if it doesn’t trigger on a prompt it should handle, fix the description first.
When an answer is worse than the original, change one file, run the prompts again, and compare. Keep the old answers so you can see whether the change helped.
This takes an hour or two the first time. After that, you have a test you can rerun whenever the model changes, which it will. If you want a more structured way to compare answers, I walk through one, with a worksheet, in A Dead-Simple Way to Test Your Chatbot’s Knowledge.
Step 4: Run it where you work
The same folder works in more than one place. Here’s how to set it up in the three I use or get asked about most.
How do plug-ins work with ChatGPT?.
You have two routes. You can click Migrate to plugin on your original GPT (OpenAI’s migration guide has the details) and let ChatGPT build the plugin. Then compare its skill with your SKILL.md and replace the instructions with your cleaned-up version.
Or you can upload your own folder. Zip the folder, then go to Skills and choose Create → Upload from your computer. Either way, run your tests again afterward.
One caveat: OpenAI’s pricing page lists skills on every plan, but its help docs still mention only work and education accounts, and some Plus users report that uploaded skills don’t run. Check your own account before you plan around them.
How do I use plug-ins with Claude?.
Claude uses the same skill format, so your folder needs almost no changes. Make sure the folder name matches the name in your SKILL.md header, then zip the folder itself, not just the files inside it. In Claude, click Plugins in the left-hand menu, press Add, and choose Upload.
There’s also a simpler route. Before I’d heard of skills, I ran my Genre Coach inside a Claude project. The instructions went into the project’s instructions, and my course materials went into its knowledge. That still works, especially for one course or one client.
Open models.
If you’d rather not depend on any one company, a local tool like OpenWork can read the same markdown files straight from a folder on your computer and run them with an open-source model.
I walk through the setup in How to Set Up a Free Alternative to Claude Cowork. This is where an AGENTS.md at the top of your folder starts to pay off, because these tools read it every time.
Whatever you choose, keep the original folder somewhere you control. Every upload is a copy. When something changes, edit the folder and upload it again.
If you teach with GPTs
Teachers have the hardest version of this migration.
A shared GPT link worked for a whole class. A migrated plugin starts private, and students who used your GPT don’t automatically get access to the new version. Depending on your school’s account and their own plans, some students may not be able to run skills at all.
So before December 11, decide what students actually need from your GPT.
If they need the assistant itself, check whether your school has a ChatGPT Edu or Claude account that lets you share plugins or skills. If it doesn’t, a project with your bundle’s files uploaded is often the simplest fallback.
If they need what the assistant knew, like your rubric, your genre definitions, or your examples, then the bundle may be enough on its own. Students can load those files into whatever AI tool they use.
But I’d push one step further.
This retirement is a good reason to stop handing students finished chatbots. Teach them to build the bundle instead.
This spring in ENG 326, students will write their own SKILL.md for a real audience. They’ll sort their knowledge into reference files, write a style sheet, and test the result before and after. That’s technical writing ... audience analysis, structured content, and usability testing, aimed at an AI reader.
A student who has only used my chatbot loses it on December 11. A student who has built one can rebuild it in whatever tool comes next.
Teach students to be builders, not just users.
If you still want a chatbot
Some of you need a link students can click and start chatting. The bundle still gets you there, and you have more options than you did with GPTs.
Teach students to be builders, not just users.
A Claude artifact. Give Claude your bundle and ask it to build a chat interface, then share the link. Each person signs in with their own Claude account, free or paid, and their usage counts against their own plan, not yours. If you update the bundle, rebuild the app.
Poe. Create a prompt bot, paste in your SKILL.md, and upload your reference files as its knowledge base. Poe’s list of supported formats doesn’t include markdown, so you may need to save your files as .txt.
BoodleBox. Built for classrooms. Make a custom bot, add your reference files as its knowledge, and share the link with students. You can also see how they use it.
Gemini. Gems can be shared like a Google Doc, and Google just added shareable skills. If your school runs on Google Workspace, this may be the closest thing to the old shared GPT link.
I’ll compare these in more detail in a future post.
Portability is a writing skill
None of these steps require code. You saved your content, sorted it, wrote a clear agent doc, and tested it the way you’d test any other documentation. Those are writing skills, and technical writers have been practicing them for decades.
Only the reader is new. The next tool will come along sooner than any of us expect, and the people who’ve kept their knowledge in plain files they control will spend an afternoon moving it. Everyone else will start over.
You have until December 11. Start with your most-used GPT, save the copy this week, and build the bundle from there.
➡️ I’m building a GPT-to-Skill Apprenticeship to go with this post. Paid subscribers will get an early preview of the resources as I build them, starting with a starter bundle template and my annotated Genre Coach bundle.
➡️ If you want structured practice turning your knowledge into instructions and references an AI can use, my self-paced course Writing with Machines walks you through it. I’m revising it now to center on skills and bundles.
Leave a comment and tell me which GPT you’re migrating first, or where you got stuck.